Saturday, 24 October 2015

Universal Email Conversion Tips For Home & Corporate Users

This article describes the need of email conversion along with the need for a universal converting utility for recovery of email data.

As we know, there are millions of users across the globe that access the internet and while using the service there comes the need of sending and receiving emails.

What is Email Conversion?

It is the procedure of converting the repository of a given email client into the repository format of another email client.

Why We Need To Convert Emails?

There are many email clients available for the home as well as corporate users to choose and decide from, according to what suits their needs and requirements.

Requirement of such applications is generally encountered in the following conditions:-

  • Change of Platform (OS) – Whenever the user shifts from one platform to other the need of conversion is possible to arise so that the other email client software can use the converted file.
  • Change of Email Client – If the users want to shift their mailbox to other email client, generally they are required to perform conversion as the file formats usually vary.
  • Corrupted File Format – Whenever there is a case of corrupted email files, then other method to recover them is by converting the files to other format using commercial programs.

What Are The Main File Formats Used?

There is a huge variety of email clients available that each generates a different kind of repository for data storage. Following are some of the most commonly used ones:-

  • .PST- It is supported by Microsoft Outlook. It is the mostly used file format.
  • .EDB- It is supported by Microsoft Exchange Server.
  • .DBX- It is supported by Microsoft Outlook Express.
  • .NSF- It is supported by Lotus Notes (IBM).
  • .MBOX- It is supported by Mozilla Thunderbird and a number of other applications.
  • .OST- It is supported by Microsoft Exchange Server.
  • .OLM-It is supported by Microsoft Outlook for Macintosh (MAC).
  • .IMM- It is supported by Incredimail.
  • .TBB- It is supported by THE BAT!
Above is a list of the few file formats along with the respective email clients that generate/support them.

Are You Switching your  Email client Or Platform?

Migrating to a different email client or platform requires a conversion of the file format which can be a nightmare for the user without a converter. An organization can suffer huge loss in the business since emails are the backbone for gaining profit or work.

But don’t worry there are many tricks available to solve the issue. The best option is to choose an email conversion method, only you should always back up the  data at a specified location so that in case of emergency it can be recovered without the need of third party software.

There is a converter option for every email client. Manual as well as software tool can serve the purpose.

Manual Methods

Emails can be recovered in their original form by using the manual tricks. However, that depends on the email clients being used. Some of the general methods are mentioned below-

  • Disconnect Old Mailbox- In case of mailbox recovery; the general step is to disconnect the old mailbox from email client.
  • Create New Mailbox And Reimport The Files - After creating new mailbox and importing the old files, there are maximum chances that the data can be recovered.

Limitation

The manual method is always bound with some limitations, as it can’t go beyond certain limits. Hence, in that case a third party software, mainly an email converter can help solve the problem.

Software

Using a software to recover the mailbox is a professional way to tackle the problem. Mainly for corporate users, it serves as the lifeline.

For every email client the converter should be different which depends on its file format. The main email converters used are mentioned in the order of their demand amongst users:-

  • EML TO PST Converter
  • EML TO NSF  Converter
  • PST TO MBOX Converter
  • OLM TO PST Converter
  • EDB TO PST Converter

These are some of the options available generally for small scale or home users. In some cases, the user needs a universal conversion tool for shifting between platforms. In case of email, recovery, it can serve all the combinations for the most file formats used in different email clients. Therefore, for corporate users special bundle packages are made available that have all the combinations to serve the purpose.

Conclusion-

Modern world can’t run without internet and emails. They are the main source of livelihood for it. Hence, email conversion serves the purpose in order to migrate from one platform to other.

In the next article, I will be explaining a particular converter in detail.
I hope that the above article helps users know the importance of email conversion.

If the above tips help you to solve the issue, do mention it in the comment. For any query or suggestions related to the article, feel free to ask. J


Thursday, 20 August 2015

How Can One Truncate Microsoft Outlook Email Messages?

MS Outlook is one of the most versatile email clients till date. Even though the storage formats differ, it is fully functional in both Windows and Mac operating systems. You can use it in cache enabled mode with Exchange server and also can make its use when offline. All these factors have largely contributed in its popularity worldwide and thus has emerged as one of the most used email clients on a global level. There are different versions of Outlook available and thus different users may be working on different versions.

The only time when Outlook might pose problems for its users is when they have to face issues related to the size of the PST file.

Why To Truncate Outlook Email Messages?

The previous versions of MS Outlook i.e. MS Outlook 2002 and earlier versions stored their data in ANSI type PST file. This ANSI PST file has the size limitation of 2 GB. In case you are still using the earlier versions of Outlook, you might be experiencing corruption issues in your PST file. This is because your PST file has reached its maximum size limit and the data exceeding the limit usually gets deleted. In order to fix this problem, the users can opt to truncate their email messages so as to reduce the size of their PST file.

Before moving on to the procedure to truncate the messages, let us first have a look on the errors that usually arise when the ANSI PST file crosses the 2 GB size limit.

Errors Due To Oversized PST File


  • When the users try to access an oversized PST file, you will encounter below mentioned errors.


You can also see the following error displayed:

  •          When your Outlook PST file reaches its maximum size limit, new messages cannot be saved in the PST file.


 Furthermore, Outlook will not receive any new messages. At such instances following error may arise:


All the above mentioned errors can be avoided by a truncation utility.

PST2GB: PST Truncation Utility

In order to truncate Microsoft Outlook email messages, Microsoft provides a utility named PST2GB. The tool helps the users to truncate the PST files in smaller parts so as to truncate the email messages of Outlook. This enables the user to overcome the above mentioned errors encountered due to large sized PST file. The users can specify the size limit of the PST file up to which the file has to be truncated.

Note: Before truncating the PST file using PST2GB, make sure to back up the PST file data in order to protect the data from getting permanently deleted.

Limitations Of PST Truncation Utility

·       A lot of time is consumed while truncating the PST file. In case the user gets unsuccessful, he will need to try again and again till the file is truncated.

·         The tool while truncating the PST file may permanently delete some of the data residing in the PST file.

Conclusion

Although PST2GB deletes some data from your PST file, it can still be used to truncate Microsoft Outlook email messages after taking backup of the PST file. And  thus can avoid the occurrence of the PST file errors.


Wednesday, 5 August 2015

Outlook 2013 Cannot Send Email - Error 554

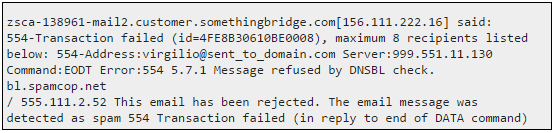
When working with MS Outlook, an email message is transferred through multiple mail servers before it reaches its final destination or recipient’s mailbox. But at times due to certain issues the message does not reaches its intended recipients and is bounced back. This hinders the smooth communication process and leads to generation of some errors. We will focus on the Error 554 which is generated when Outlook 2013 cannot send email. Also this error is generated in the other versions of Outlook as well.

Probable Reasons Behind Error 554

Mainly there are two factors responsible for the Error 554 in Outlook. These are:
  •  Restriction On IP Address

Some of the mail servers, due to security reasons restrict some IP addresses and domains from where they receive messages. Therefore, when a message from a blocked IP address is sent to these protected mail servers, the message is bounced back and an error is generated at the sender’s end. This error message states the following:


The return message that is sent to the sender of the email contains detailed information like timestamps, IP Address or the server hostname.

  • When Message Is Sent Via Exchange Server
Error 554 can also arise when a mail from Outlook is sent through Exchange server. This error message is observed in case the user has not selected the option “Our server requires authentication” while setting up the Outlook account. Also in case the domain status in Control panel has been set to “Pending Verification” this error can arise.


Fixing Error 544 In Outlook

You can fix the error 544 by following below mentioned procedure:
  •     Click on File option in Outlook.
  •     Select Account Settings option.
  •     Now, select the account from the list and click Change above the account name.
  •     In Change Account dialog box click on More Settings.
  •     In this select the Outgoing server tab.
  •   In this tab make sure that the option “My Outgoing Server (SMTP) requires authentication” has been enabled.
  •     Click OK, then click on Next and then click on Finish.

Note: Repeat the same process with Incoming Server.
By performing the above procedure, we believe that the Error 554 will be fixed and you will be able to easily send messages.

Wednesday, 15 July 2015

Explore the Difference Between SMTP, POP & IMAP!

Email handling can be done through different methods which technically are referred as Protocols. These protocols are used for either receiving the emails or sending the emails. IMAP and POP protocols are used for receiving the emails and SMTP protocol is used for sending the emails.  When any user sends an email, the mail message is moved from the front-end email client to the mail server. This mail server will then use the destination email address to track the destination. So the emails will be stored to the mail server unless your mail client demands to download it. Here IMAP and POP play an important role.

POP:

When users use computers, none of them utilize these computers all the time. Computers are not online all the time and are turned off when necessary. POP (Post Office Protocol) is an Internet Standard for retrieving emails from the mail server where it is stored temporarily. In case all the computers were supposed to be online, protocols like POP wouldn’t be useful at all. This is because in that case the emails would have delivered directly to the recipient’s computer. But the problem is computers are turned off mostly and because of this, emails have to be stored somewhere else unless user is online again. POP performs the interaction between front-end client and server which is holding the email messages.
POP (Post Office Protocol 3) gives a standardized way for users in order to access mailboxes by downloading them to the computers. It works in three states; Authorization, Transaction and Update. While using the POP protocol, the email messages will get downloaded from the server to the local system. As emails are saved to the system, one can easily access the emails even when internet is unavailable.

IMAP:

IMAP (Internet Message Access Protocol) is another Internet Standard for receiving or we can say retrieving emails from the email server. IMAP email client generally saves the email messages by downloading a copy of the messages from email server to the local system but keeps a copy of the messages in the cloud server as well. The difference is that IMAP email client will regularly synchronize local mailbox and mail server (cloud). In case any message is deleted from the local mails, it will be deleted from the cloud as well when both of these platforms (email server and local mailbox) are synchronized.
The most important feature of this IMAP email client is that the user can access the emails from more than one location or device. This is because the emails are stored in the email server and hence can be access through Mobile, system in another location, etc. Emails are stored in the central server and hence can be accessed anytime. Users can access the emails at home and work-station as well.

SMTP:


SMTP (Simple Mail Transfer Protocol) is the standard used by Mail Transfer Agent for sending emails and while using the SMTP, email messages are transferred from client to SMTP server. The messages can be then moved from one SMTP server to another also. IMAP and POP3 are used for retrieving the emails from SMTP Server. The most common model for SMTP is it using the TCP Transport service in TCP/IP suite. Emails which reach to SMTP are either forwarded to remote server or it is delivered to local mailboxes on the local server. The SMTP protocol is only used for sending emails and not for receiving them.

Tuesday, 30 June 2015

Know How to Check Mailbox Size in Exchange 2007

While undergoing a transition from Exchange server 2003 to version 2007, there has been a significant change in the way of managing things at server level. Prior to Exchange server 2007, things remained as an option in GUI. However, with the introduction of PowerShell commands in Exchange server 2007, there has been gains and losses for users for people. For example, the capability to view the mailbox statistics has been a long-standing feature that was available with Exchange server 2003 is no longer with Exchange server 2007.
In case of Exchange Server 2007, you cannot easily view the mailbox statistics; we have to execute some PowerShell commands. Therefore, here we are going to have a look on the detailed procedure for how to check the mailbox size in Exchange Server 2007.

Viewing Mailbox Size in Exchange Server 2007

The main reason for Microsoft eliminating the feature for displaying the mailbox statistics from Exchange Management Shell of Server 2007 is due to the overall change in the management process of the management console. The recipient configuration present in Exchange server 2007 does give you the list about the number of user mailbox, groups, or contacts present in the server but it will not provide you with the specific details like the quantity of items in the mailbox and their size.

To get the information regarding the size of the mailbox, you have to start constructing PowerShell commands. If a user is looking for a basic report that comprise of the user mailbox size then use the PowerShell command “Get Mailbox Statistics.

Here is how to get the mailbox size, type the given command


The first impression of Get-MailboxStatistics cmdlet is that the command is going to fetch data in volumes from the server.
The above cmdlet provides the size of the mailbox in bytes. The field StorageLimitStatus indicates the status of a specific mailbox. The Output can be BelowLimit, which means that the size of the mailbox is below the IssueWarningQuota

If the mailbox size is above IssueWarningQuota but below the ProhibitSendQuota, then the status of the mailbox is changed to IssueWarning.

How to Get the Mailbox Size in KB?

For getting the output regarding the size of the mailbox in KB, use the following cmdlet


How Can You Obtain The Output Information On PC?

If a user is interested to save the output information regarding the mailbox size and other details, then they can do so by importing the result in CSV file format. For importing the output in CSV file format, use the following cmdlet. 


Conclusion

The above content fairly describes the way for how you can check the mailbox size in Exchange Server 2007. Further, you can also use other PowerShell cmdlet for extracting other type of information regarding the mailbox. Some of which may include last login time of the user and storage limit status.

Thursday, 18 June 2015

How to Convert OST to PST Manually?


MS Exchange server application comprises an added facility of creating an offline local file comprising of complete account data like emails, contacts, journals, notes, etc. This local file is created when the Outlook cached mode is enabled while configuring the Exchange application. User is allowed to use this local OST file without any dependence in network connectivity. When user establishes the connection of Outlook application with Exchange account, this OST file gets synchronized and the email data is synched accordingly. Although this OST file has some restrictions for its usage and because of these restrictions users can demand to convert OST to PST manually.

What Demands OST to PST Conversion?

There are many scenarios which demand such conversion. For instance; the file size difference between Exchange mailbox and the local replica OST file call for archiving or storing the OST email data to another file format. This will keep a check on the size limit of OST file which is very limited as compared to Exchange database. There are many other reasons like OST file cannot be accessed in any other system by mere copying it or importing it in another system’s Outlook application. The file is bound to original MAPI Exchange profile and hence it cannot be accessed in any other system.
All such situations demand to assemble email data to another file format which can also be accessed like OST and emails can be viewed with similar interface and usage. OST being an Outlook application storage file, one can convert OST to PST manually so that the email data can be accessed in Outlook application easily. The basic factor responsible for performing manual conversion of OST file to PST file is that the OST file should not be orphan or corrupted. An active and stable file can be easily converted to PST file by following the below mentioned steps. The steps have been performed on MS Outlook 2010 application.


Steps for Manual OST to PST Conversion


Step 1: Open MS Outlook with Exchange profile.


Step 2: Go to File menu and click on Open option. Here select Import in order to export the emails to PST file.


Step 3: Another Import & Export wizard window will open where you can choose the action to be performed. Choose “Export to a file” option in order to export data from OST file and click Next.


Step 4: Here select the destination file to which you want to export the email data. Choose Outlook Data File (.pst) as an Export option and click Next.


Step 5: Select the folders from which the email data has to be exported. You can also add the filters for advanced and organized email export. Once folders are selected, click Next


Step 6: Here by default the exported file is saved to “C:\Users\Username\Documents\Outlook Files” folder location with name as backup.pst file. You can click on Browse and change the location. There are various sub-options which can be selected related to duplicate email items. Once done, click Finish.


Conclusion

The exported PST file will be saved to the provided path location which will carry the existing email data. In this way the space allocated for OST file can be free and new email data can be stored in this file now. 


Saturday, 13 June 2015

Find Out How You Can Prevent Lync from Locking Outlook’s .ost File

Unified communication platforms have proffered businesses with a wider set and options to make their communication better. Lync along with Outlook does just that by providing a wider range of options communication on the confined environment of Microsoft Outlook. This includes communication via, text, video, voice, and streaming of media. However, a stable synchronization between both the services is an ultimate requirement which is fulfilled with correct configuration and settings applied. Similarly, in this blog we will cover the tips on how to prevent Lync from locking Outlook’s .ost file along with the reason provided on why it does so in the first place.
Prevent Lync from Locking Outlook’s .ost File without Service Termination
Most users who have confronted the issue and got stuck with it chose to terminate either of the two services to get rid of the issue. But what about those who run businesses dependent on Lync services and can’t just quit it?

We will outline the troubleshooting tips that will not only prevent Lync from locking the Offline Storage Table file but also let you continue using the unified communication service.
Why?
When using Lync services with Microsoft Office (Outlook), one can save conversation directly to their Outlook Data File. However, in order to do the same Lync has set its own rules, i.e. it will need accessing the account’s OST file.
This is how connection of Lync and Outlook involves the usage and possibility of locking OST file. The process usually works in an absolutely proper manner and remains unnoticed to the end user, but only under normal circumstances.
What?
What happens in this case is exactly what happens in any case when some issue takes place, error. You will receive an error every time you try accessing something on your Outlook or within the OST data file. Some of the errors that are common to appear are illustrated as follows:

The worst that can happen is Outlook will crash.

How?

Finding out how to prevent Lync from locking Outlook’s .ost file is not a difficult part. Given below is the solution to fix the issue and tips to prevent it from reoccurring in future.

First of all, the issue arises because Outlook is probably running in a Windows compatibility mode. Compatibility mode option may have been provided with Outlook but you are not required to use it, especially when you are using any of the latest Windows versions (as we assume you are).

TIP: This mode is only applicable on applications that are extremely old. So, if the option is enabled, disable it and if it isn’t enabled do not even consider enabling it.

If errors are being received that ‘the file cannot be accessed as it is in use on some other program’ (Lync) then you need to check the compatibility settings of the program.
  1. To disable the mode or just check its status find the Outlook setup file. Right click on the ‘exe’ and click on Properties.
  2. Click on the tab for Compatibility. Now uncheck if the checkbox for Compatibility mode is checked.
  3. Also uncheck the checkbox for running program as Administrator as it should not be used unless very necessary.

In Case The Issue Is Unresolved…
If the issue still remains unresolved then you are advised to follow the steps given below that will repair your Office 365 installation.
  1. Close all the applications of MS Office, i.e. Outlook and Lync too.
  2. Start Task Manager and check whether all Office processes are closed.
  3. Go to the Control Panel and select Programs and Features. Click on Microsoft Office 365.
  4. Click on Change and select the Quick Repair option followed by Repair.
  5. When asked to close programs click on Close All.
  6. After repair run Outlook and then open Lync to check if the issue has been rectified.
Conclusion: This is how you get rid of the errors and issues cropping up in a unified communication platform of Lync and Outlook. Always make sure that when using both the services, run Outlook first and then Lync. This will prevent Lync from locking Outlook’s .ost file. You will no longer see any errors because, before Lync could access OST, Outlook already has access to it.