Friday, 10 June 2016

Where Does Outlook Store Favorites?


Favourite, the word itself defines its speciality. There is always something favourite in things you do, tasks you perform, targets you achieve, etc. Calling something Favourite is like giving preference to it. Similarly Ms-Outlook has something for managing Favourites and this Favorite thing is nothing but the Favorites Folder by Outlook. This Favorites folder of Outlook combines different accounts in one section. All your Favorites items or folders of different accounts can be placed in one folder named as Favorites Folder.

So the question arises here is: Where does MS Outlook store its Favorites folder?

In most of the discussions users say Favorites information of Outlook is stored in Outlook.xml file, and if you need to backup Favorites folder then you have to save this Outlook.Xml file somewhere. The default location path of Outlook.xml file is :
c:\users\username\appdata\roaming\Microsoft\Outlook

I configured my Exchange Account with Outlook 2013 in order to check the location. However, I found out that it was wrong based on my testing. Now I deleted the Outlook.xml file but the Favorites folder is still available when I open Outlook. When I terminated Outlook, a new Outlook.xml file is generated. I tried to replace the new Outlook.xml file with the tested one and now what happened is that the new Outlook Client won’t display Favorites folder. So what I found is, Outlook Favorites folder is not stored in Outlook.xml file. If you want to access other local MS Outlook item, you can use Outlook PST Viewer to view the data file.

Where Is Outlook Favorites Folder Stored?

1. My Favorites folder is still shown as it did before, with my Outlook or Exchange Server Account.


2. I can see the same folders listed when I logged on to the account using Office Web App (OWA).


3. Outlook and OWA have their Favorites Folder synchronized. As I added a folder to Favorites in Outlook, I got the same in OWA too. You can see the same below:


4. The folder I added in Outlook is automatically added to OWA too.


5. These were the scenarios for Exchange Account. Let’s talk about the other accounts in Outlook too.

(i) When I added an IMAP account in Outlook the Inbox folder automatically got added to the Favorites folder of Outlook.


Steps To Reset Favorites:-


1. Press Window + R to start Run box> Now type “Outlook.exe\resetnavpane” and then press Enter. From here, you can reset your Favorites.


2. As you reset your Navigation pane using “resetnavpane” command, it automatically regenerates the Navigation pane for the current profile. As Navigation pane is a part of Outlook Favorites, it will reset too.


Some Default Favorites Folder of Different Account Types:-

1. Exchange Account – Inbox, Sent items, Deleted items
2. IMAP Account – Inbox
3. There is no default folder in POP3 account.7

Conclusion :-

1. Favorites folder is not stored in Outlook.xml file.
2. Information of Favorites folder is stored in mailbox.
3. Exchange and Outlook Account Favorites folder synchronizes automatically.
4. When you use Outlook with POP3 account nothing is added to Favorites folder.
5. When you use Outlook with IMAP account Inbox is added to Favorites folder.

Tuesday, 7 June 2016

Extract Emails From OLM File - Through Easiest Approaches


Easiest Approaches To Extract Emails From OLM File

There are number of users of apple product. OLM is an extension of Microsoft Outlook 2011 for Mac. These file are the database files that contains all the user’s Outlook folders such as inbox, calender, contacts, tasks. Moving from Mac OLM to PST is quite challenging task but with the help of conversion software it can be done easily. Both mail clients are availed by Microsoft but have different functionalities as one supports Outlook for Mac and other support for Windows. There are many reason for extracting emails form Outlook Mac mailbox to Outlook PST.

Reasons For Extracting Emails From OLM File


There are number of reasons due to which a user need to Extract Emails From OLM file to PST files as listed below.

1. When view options are selected and you cannot access OLM files as it hides email messages in inbox. Then there is a need to Extract Emails From OlM file.

2. When you look for new email messages and no email message are received even though there is no error or synchronization problem generated in entourage for mac. Then you required to Extract Emails From OLM File.

3. When mailing list manager or junk mail filter directing email messags to other folder or sending them to trash we have to Extract Emails From OLM File in order to access them easily.

4. May be your email account is not in send/receive schedule mode.

5. It could be Due to folder setup in web based account.


Discussing Types of OLM files:-

There are two types of files available on Mac Outlook 2011 email application

1. Outlook archive .OLM -> These files are hard to export to other applicaations.
2. .Olm -> These files are easy to export, stores and manage in Mac Outlook 2011 database in .OLM file format.

Why SysTools OLM to PST converter is an excellent tool for Extracting Emails From OLM File:-


1. Because it effectively Extract OLM file and then convert it to PST or many other file formats.
2. It generates instant preview of all emails and attachments.
3. There is a split option for large size of PST file also available.
4. It is available with an option to convert OLM archive mail folder to PST.
5. It convert all OLM email messages, contacts, notes and attachments etc.

How to use SysTools OLM to PST Converter to Extract Emails From OLM File

Steps How to Extract Emails From OLM File:-


1. Download SysTools OLM to PST converter and go to
Start-> Menu-> All program -> SysTools Outlook Mac Exporter-> Add File


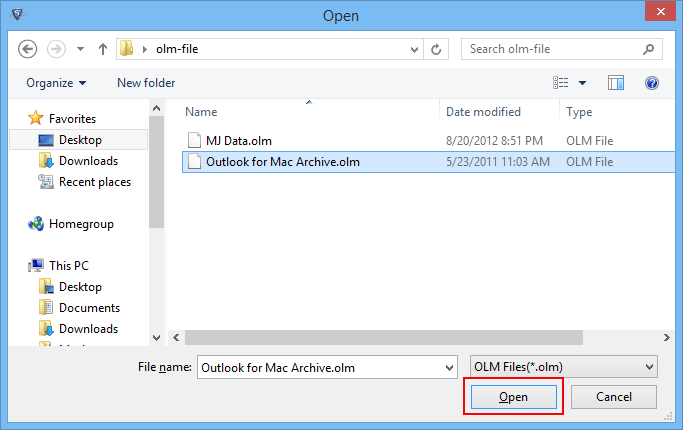
2. Now Browse the respective file location and Add File. Now select the OLM file location and click open to add the OLM file to software to Extract Emails From OLM File.


3. Now Add File for scanning while scanning it shows the File Name, Size and Time Details. As this scanning process is running you can preview the emails in normal Mail Tab.


4. Click on the Attachment tab and view the attachments separately.


9. Select the email you want to export and click Export.


10. Select the File format in which you want to Export OLM file.


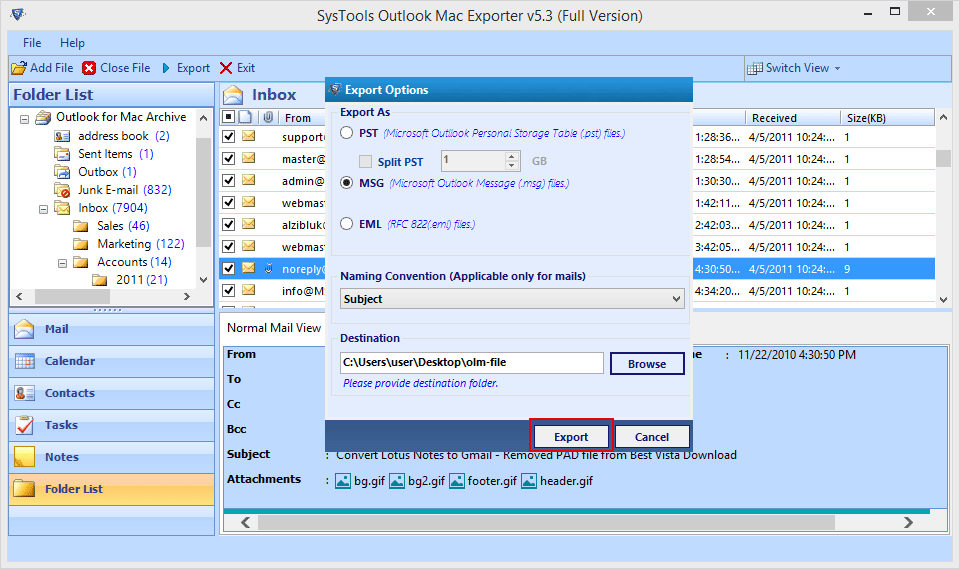
11. Browse and select the destination location and click export.


13. Now save the Export report in csv format.


14. Now you can check the file you have exported at the location where you saved it and Open it in PST file format.


15. Now you can check the Items exported by using Outlook Mac Exporter Software. That export all your mails to PST and then Extract emails from olm file.


These are the simple approaches discussed here how to Extract Emails From OLM File. By using these approaches you can Extract Emails From OLM File and after Extracting you can easily access them in any File Format.

Monday, 6 June 2016

Know How to Import OST to Office 365 Platform in Simplest Steps


Want to move OST to Office 365 as your exchange server is crashed and your Outlook is running in cached mode but unfortunately, you could not import OST to PST before changing your account.

Quick Solution: You can upload OST files to Office 365 using SysTools OST recovery tool.

THEN THIS IS THE SOLUTION TO YOUR PROBLEM:-

There are many ways to migrate from OST to Office 365 one could be exchange on premises to exchange online. Where Exchange on premises sends all your mailbox data to exchange online (Office 365). But to perform this task Exchange on-premises(exchange server) have to have public presence only then it will provide an Outlook anywhere service. This could be a tedious method also to convert from OST to PST Office 365.

OR


The another method is to import all your Outlook mailbox of OST file's data to PST file format first and then access it in Office 365 from anywhere. To do so you wont have to have connection with the exchange server. You Just need to logged in to Outlook under user domain account and MAPI profile and use the cached OST data to export it to PST. Because you cannot perform this conversion until and unless being logged in with user domain account

After you performed this conversion where your .OST mailbox data is imported into PST make sure all your OST data is in PST format and then remove the current exchange account and add a new Office 365 account.

If you upload OST to Office 365, it helps you to synchronize your mail box effectively and open a corrupt or orphaned OST file also. Moving your OST mailbox data to Office 365 can also provide you the authority to access large size of database files. To move OST data files to PST there are many software available but after getting your problem I suggest you to use a reliable software that export your OST data safely and easily to PST format.

We can go with “SysTools OST to PST Converter” because of its additional qualities and other great features.
First we discuss how to convert OST file to PST using “SysTools OST to PST converter” tool then we will discuss in last section that how to import this PST file to Office 365 environment using
“SysTools Office 365 Restore”


Listing Down the Steps to Convert OST to PST


1. Open the software and click on the browser to add the file you want to migrate from OST to PST.


2. Get a preview of the offline storage mailbox content on the display panel of the software.


3. Now choose the items you want to export to PST and select the destination type to convert OST to PST.


4. Choose the destination path to store PST output file and click on export to start the process.


Advantages of OST to PST Converter:-

The advantages that you get when you use this tool to convert OST to PST (Office 365) are as follows:

1. The tool recover damaged OST files also.
2. You can preview all files before performing the conversion.
3. It works with all windows operating systems.
4. You can preview the attachments also.


After converting your Outlook OST file to PST format you can easily access them by logged into Outlook under user domain account and MAPI profile. Because you cannot perform this inversion until and unless being logged in with user domain account. For doing so you can use another SysTools Software which is “Office 365 Restore”. This Software is all about how you can upload PST file data in Office 365. You can try this because it also recover cached data and is reliable tool too to get your ost all mailbox data which you could not able to access before in one click go with SysTools Office 365 Restore.


Some of the Additional Benefits in “SysTools Office 365 Restore” are:-

1. This tool come with no size limitation.
2. Its graphical user interface is very user friendly.
3. Complete data migration from PST to office 365.
4. It always retain the technical attributes of the data even after migration.
5. Provide selective data restoration and you can apply date wise filters to upload selective PST to Office 365.
6. You can perform restoration at any point of time.
7. It has folder orientation utility also.
8. Data restoration is done without any data overlapping with no file size limitation.
9. It has great report generation feature also.


Monday, 23 May 2016

Export Outlook Mails to MBOX Using Simplest Approaches


MBOX is an application that is supported by multiple mail clients which includes Entourage Eudora, Apple Mail, Mulberry, Netscape, Opera Mail, Gnu Mail, Mutt, Cone, Claws Mail, PocoMail, Sea Monkey. MBOX file format is used for holding collections of email messages. All messages in MBOX are concatenated and stored in plain text as a single file. It uses 7-bit ASCII text for storing the message in encoded format. However, Outlook supports only PST format, and the file being a proprietary of its origin client is not accessible on any other platform. Mobile devices that are connected to Exchange Mailbox using ActiveSync cannot open PST file. PST file keeps the entire data of an Outlook profile at one place. This data includes emails, calendars, notes, contacts, tasks, etc.

Need to Export Outlook Mails to MBOX

When you want to move your profile data in PST format, from Outlook for Windows to Apple Mail on a Mac machine then conversion will be required. The latter client supports only .mbox format files and an Outlook PST file won’t be accessible on it. Outlook data files are a complete storage of collective data and its vulnerability to corruption puts the entire profile data in danger. MBOX files on the other hand store messages of a respective mail folder. Outlook Mails are prone to corruption as they have a defined size limit of 2GB and if the file grew beyond this limit it is corrupted. When the Outlook file is shared among multiple users then the chances of Outlook file corruption increases. Outlook files are device specific and are not accessible on any other device.

How to Export Outlook Mails to MBOX

There are multiple ways to export Outlook mails to MBOX. Here we are using a third party tool to perform this process.


Steps to Export Outlook Mails to MBOX Using Third Party Tool


1. Visit the official website and download “SysTools Outlook to MBOX Converter”


2. Once installed, run the tool can click on Open to begin with the process.


3. After you click on Open, browse and select the Outlook PST file to be converted from the Open window. Click Open.


4. Now, click Browse to select the file that is to be converted or change the selected one


5. Before clicking on Export, select the destination path of the Outlook PST file by clicking on the second Browse button on screen.


6. Select between Yes or No radio buttons given below to choose whether to maintain the folder hierarchy or not.


7. Click Export to begin


8. As conversion begins, you can see the Count Details of PST file


9. As the Export Finishes click OK, now you can find the MBOX file at the defined destination path.


10. Navigate to the location where you saved Exported Outlook Mails in MBOX format


Conclusion

This blog is aimed to help users in defining how they can Export Outlook Mails to MBOX as MBOX is supported by multiple mail clients and Outlook supports only PST file format. Using Outlook PST format can sometimes lead to various unknown problems, you may lose your data at some point or so. Instead of using manual procedure, go for third party tool to Export Outlook emails to MBOX. You can use the secure and reliable tool to Export Outlook Emails to MBOX.

Thursday, 19 May 2016

Export Exchange 2010 Mailbox to PST Using PowerShell Commands


This article will describe you how to export Exchange 2010 Mailbox to PST. A request of mailbox report is a process of exporting mailbox and other related data to a PST file. Only one export mailbox request can be created per mailbox, and each Mailbox request must have a unique name. Let’s talk about the command we will be executing to Export Exchange 2010 mailbox to PST.

PowerShell Command

PowerShell commands are introduced by Microsoft Exchange 2010 and are now becoming popular day by day as users are migrating to Exchange Server. They are very helpful resource for exporting mails in severe conditions where EDB files are corrupted, dismounted, or disconnected. There are various new features provided by Microsoft to Exchange Server, one of them is the use of “cmdlet” for exporting mailbox data to PST. Cmdlets are usable for carrying out administrative tasks and on premise Exchange Server premise. However, New MailboxExportRequest command is available in Mailbox Import and Export role, to use the PowerShell command we have to add the Mailbox Import Export role to a role group. Here, we discuss how to add a role to a role group and easily export Exchange mailbox to PST using PowerShell Command.

Managing Role Groups

Adding New Role Group

1. In the Exchange Administration Center (EAC), navigate to Permission -> Admin Roles and then click Add+

2. In the New Role Group Section window, provide a name for the new role group

3. You can either select the roles that you want to assign to the role group and the members you want to add to the role group

4. You can add the members accordingly

5. At last, click save to create the role group


Add Management Role to A Role Group

1. In the EAC, navigate to Permission-> Admin Roles

2. Select the Role Group to which you want to add a role, and click Edit

3. In Role section, select the roles you want to add to the role group

4. After finish, click Save

Steps to Export Exchange 2010 Mailbox to PST


1. Grant complete rights to “Import Export Mailboxes” to an account in organization


2. Now, create a network share, which is used as a file path for the exported PST files by selecting Exchange Trusted Subsystem


3. Run New-Mailbox Export Request to export Exchange mail to PST


4. To view the status of the request use the command “GetMailboxExportRequest cmdlet”


5. With GetMailboxExportRequest cmdlet command you can see other related details


6. To see the progress of all mailbox export requests, run: Get-mailbox-Export-Request-statistics cmdlet


7. To export archive mailboxes run this command


8. To remove mailbox export request run this command


9. To completely clear all the completed mailbox export requests from Exchange, run the following command.


Conclusion

This blog is aimed to make users know that they can export their Exchange 2010 Mailbox to PST. Moreover, in order to do so, instead of using third party EDB to PST Converter Software could be used for this extraction. In addition, the only two required parameters for the command are the file path to export PST file and the name of the mailbox to export along with administrative rights to the server.

Thursday, 12 May 2016

OFFICE ADDRESS BOOK - Complete Workaround of OAB


Office Address Book is a collection of address book or address list which is created by using Outlook contact folders. Offline address book is generated for Exchange users immediately after their account is created. It is available only when the maintenance task of Exchange Server is completed. Outlook mail account, which is associated with Exchange Server, can avail the facilities of office address book for managing contacts list. If a user is using Outlook with MS-Exchange account then your Address book will also include the Global Address List. Global Address List is a list that contains names and e-mail addresses of all the users with an account on Exchange Server.

How To Download Office Address Book?

There are two possible ways to download address book for outlook 2010/2013/2016

1. Navigate to File then go to Account Settings

2. Select Download Address Book

3. Check that the company address list is displayed in the Choose Address Book drop down menu.

OR

1. Navigate to Send/Receive then go Send Receive Group

2. Click on Download Address Book

Download Address Book for 2007

1. Navigate to Tools then go to Send/Receive.


2. Click on Download Address Book.


3. In Information to Download option, select Full Details or No Details as per your need.

Adding an Address Book

1. Click on File option.

2. Go to Account Settings and then select Account Settings in it.

3. On the Address Book tab, select New.

4. Now, you are required to select the type of address book.

5. Add an address book by using internet directory service (LDAP)

6. Select LDAP and then click Next.

7. Now, select a server name, which is provided by your system administrator or internet service provider.

8. Click on More Settings.

9. In the display name, type the name of LDAP address book, which you want to display in address book list or dialog box.

10. In connection details, type the port no that your system administrator provides you.

11. Select Ok, Next followed by, Finish.

Removing Address Book

1. Go to File menu

2. Click on Account Settings and then select Account Settings in it.

3. On address book tab select the address book you want to remove.

Error in OAB

Outlook need not to connect to exchange server every time when a mail has to be sent or when any other user information is needed because of OAB facilities. The OAB file has to be synchronized with GAL on daily basis with Exchange Server. If OAB fails to synchronize with GAL then an error message occurs showing that the security service on the server is not valid “ERROR:0x80072F06”. Due to this error, clients are not able to download OAB files.

Causes of OAB File Error Global

1. Inappropriate updating of .oab file

2. Security certificate issue on Exchange Server

3. Fails to synchronize with GAL on Exchange Server

4. Manually downloading the OAB file from Exchange Server

5. The object list of OAB either missing (typo) or misprinted

6. OAB file corrupted or is unusable

How to Fix These Errors in OAB File?

1. Manually reset or update offline address book

2. Make sure that the URLs of OAB are set correctly in server configuration

3. The external and internal names match the names in SSL certificate

4. Delete the old OAB file in Outlook and download the new OAB file from the Exchange Server. If the error still persists then you will need to repair your Outlook using the best suited tool

5. If your OAB file has been corrupted then try to convert OST file to PST using any conversion software, so that the corruption of OST file could be tackled with

6. Before performing the conversion, make sure that it is compatible with current MS Outlook and Windows versions

Conclusion

Office Address Book is created using Outlook contact folders. There are two possible ways to download office address book. If OAB fails to synchronize with GAL then “ERROR:0x80072F06” occurs, which can then be resolved using various techniques and methods discussed above.

Saturday, 30 April 2016

Difference Between Exchange EDB and STM File


Microsoft Exchange Server has two elementary components, which are Storage Group and Databases. The Storage Group is known as a container used for keeping Mailboxes and Public Folder Store. Storage Group on the other hand contains multiple data stores and each data store is somewhere associated with Exchange Server.
When a new Exchange Server is installed, the two data stores Mailboxes and Public Folder are created initially as default stores. This default Mailbox store contains two database files:

1. Priv1.edb and
2. Priv1.stm

From here, the two file formats appear into the scene.

Priv1.edb is a rich text file that includes message headers, message text, and standard attachments.

Priv1.stm is a file that contains streaming internet content, which includes audio, video and MIME data.


What are EDB Files or .edb File Extension?

Exchange Database files are known as EDB files, which were designed on single client server architecture. Moreover, .edb is the file extension of the Exchange database or EDB files. These files contain rich text data stored in Exchange Server and Exchange Server uses Extensible Storage Engine (ESE) in order to access files that are stored in .edb extension. Components that an .edb file contains are email, message, folders and attachments. EDB files have unique file signature, i.e. Hexadecimal ef cd 89. The earlier version of Exchange stores emails in two types of EDB files. One is priv1.edb, which keeps only private data of user mailboxes. Second is pub1.edb, which keeps shared folder data of user mailboxes. To access the EDB file you can use the Exchange EDB Viewer tool.


What Are STM Files or .stm File Extension?

The Streaming data file .stm were created in Exchange 2003 and previous version to save email attachments including some information so that it will be added “on the fly” before it is sent to you, typically it is used in order to include last modified date at the bottom of the page. Only certain application can launched Files that have .stm file extension. STM files can’t be viewed at all, as they are data files rather than document or media files. They store the internet MIME formatted content like, images, audio, video etc. Streamed database is saved here. In addition, in order to optimize the performance of application for the type of database it stores Microsoft provides this file format. However, unfortunately after Exchange 2003 edition STM file was excluded from the database structure.


Difference Between Exchange EDB and STM File?

1. The fundamental B-Tree structure is present in .edb file whereas it is not present in .stm file.

2. .edb file permits a top-level node and many child nodes but .stm file does not permit any node.

3. The .edb file is accessed directly by ESE whereas one cannot access .stm file directly.

4. The .stm file is used in conjunction with .edb file to comprise the exchange database.

5. Both .edb and .stm file together make up the database, therefore they are treated as a single entity.

6. If you do some changes or perform any action on the .edb file the .stm file is automatically included.

7. The main purpose of .stm file is to store the streamed internet content whereas .edb file store database information.

8. Whenever you move messages to .edb file and convert it to Exchange native form it can never be moved back to .stm.

Conclusion

This blog is aimed to bring into the user’s awareness about the EDB and STM file. The segment discusses how these files came into picture and in what scenarios are they different from each other though they are part of Exchange. Moreover, the purpose of using Priv1.edb and Pub1.edb files are used.